


.svg)
.svg)


Get Business Email
No domain name required
Business Email
With a Free Domain

Introduction
In our digitally-driven world, the importance of a reliable email service cannot be overstated. Among the numerous options available, iCloud email is a popular choice, particularly for those invested in the Apple ecosystem. This guide delves into the nuances of setting up an iCloud email account, a process that's both straightforward and essential for seamless integration with Apple's suite of services. By the end of this post, you'll clearly understand how to create an iCloud account and how it stacks up against Neo, empowering you to make an informed decision suited to your communication needs.
What is iCloud Email?
iCloud Email is a free email service provided by Apple as part of its iCloud suite of online services. Users with an Apple ID can use iCloud Email, which offers email hosting along with cloud storage for various data types such as photos, documents, and backups. It integrates seamlessly with Apple devices, ensuring that emails, contacts, and calendars are kept up to date across all devices logged into the same Apple ID.
Key Features
Before creating an iCloud account, knowing some of the primary features of iCloud email is helpful.
- Seamless integration: iCloud Email is deeply integrated with iOS, macOS, and iPadOS, providing a unified experience across devices.
- Security and privacy: Apple's commitment to user privacy and security is evident in iCloud Email, with features like two-factor authentication and end-to-end encryption.
- Storage and accessibility: Users receive 5 GB of free storage space for emails, documents, and backups, with options to upgrade for more storage.
- User-friendly interface: The email service boasts a clean and intuitive interface, making it easy for users to manage their emails, calendars, and contacts.
- Cloud-based service: Being cloud-based, users can access their email from any device with internet connectivity, ensuring constant access to important communications.
Step-by-step Guide to iCloud Mail Sign-Up
The iCloud mail sign-up process is straightforward, but it's crucial to understand each step to ensure a smooth setup. Here's a detailed guide to help you through the process:
1. Pre-requisites for creating an iCloud account:
Boot up your Apple device (iPhone, iPad, Mac) or start a web browser on your computer. You will also require a valid, non-Apple email address for verification.
2. Visiting the Apple ID website:
Start by navigating to the Apple ID website. Click on “Create Your Apple ID” to begin the process.

3. Enter personal details:
Fill in your name, date of birth, and an existing email address. This email will be used for verification and recovery purposes, so ensure it’s one you have regular access to.
4. Choosing your iCloud email address:
You'll be prompted to create an iCloud email address ending in ‘@icloud.com’. Choose an email address that is unique and easy to remember.
5. Setting up security features:
Create a strong password following Apple’s guidelines. Set up security questions for additional account protection. Consider enabling two-factor authentication for added security.
6. Verifying the account:
Apple will send a verification code to the email address you provided. Enter this code on the Apple ID website to verify your account.
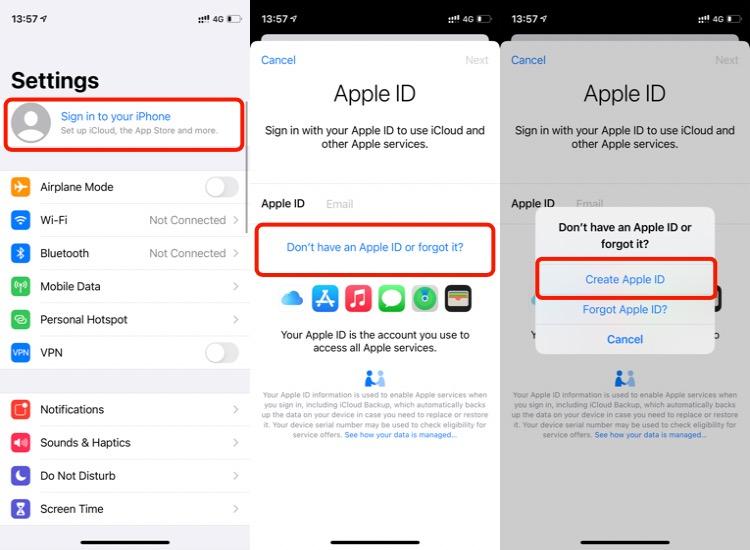
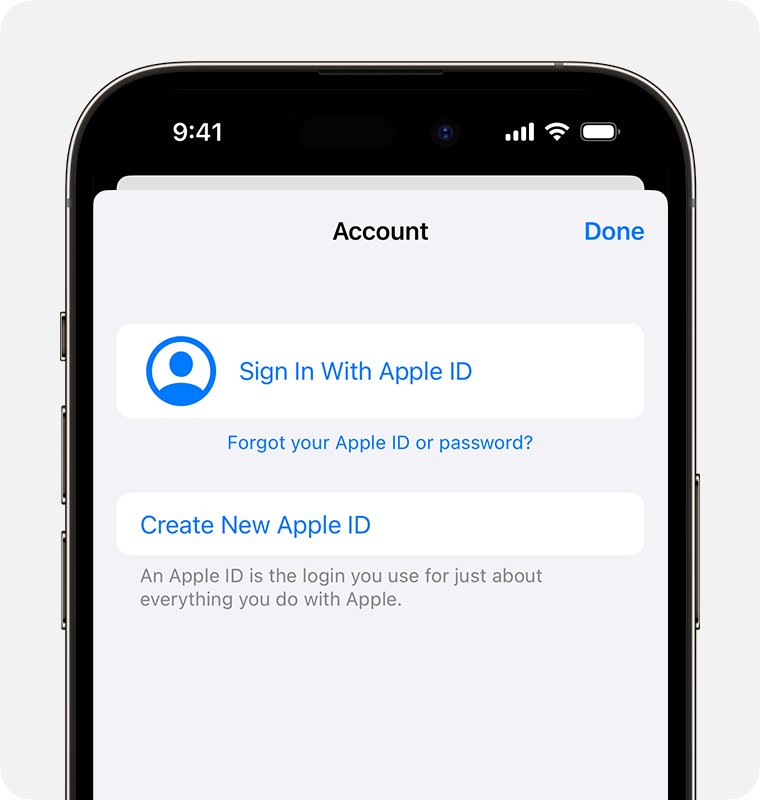
7. Setting up iCloud on your devices:
On iPhone and iPad, you need to go to Settings, tap on your name, and then iCloud. Sign in with your new iCloud email and password. On a Mac, open System Preferences, click on Apple ID, then iCloud. Sign in with your iCloud credentials. And on a PC, start by downloading and installing iCloud for Windows, then sign in with your iCloud account.
8. Finalizing the Setup:
Choose the iCloud services you wish to enable (Mail, Contacts, Calendars, etc.). Your iCloud email account is now ready to use across your devices.
7 Things to Consider to Maximize iCloud Email Functionality
- Sync across devices: Ensure your iCloud account is synchronized across all your Apple devices for a seamless experience. This allows you to access your emails, contacts, and calendar events, irrespective of your device.
- Organize your inbox: Utilize folders and filters to keep your inbox organized. iCloud Mail offers customization options to categorize emails, which can help manage a clutter-free inbox.
- Use iCloud Drive: Take advantage of iCloud Drive for storing and sharing documents. This feature integrates well with your email, allowing easy attachment of files stored in the cloud.
- Manage your contacts and calendars: iCloud Email is not just for emails; it also syncs your contacts and calendars. Make sure these are set up to update across all devices.
- Creating rules for incoming emails: Set rules to sort incoming emails into designated folders automatically.
- Using VIP and favorites: Mark important contacts as VIPs to ensure their emails are given priority in your inbox.
- Taking advantage of Siri: Use Siri for tasks like sending quick emails, setting reminders about emails, or scheduling events directly from your email content.
Neo - An Introduction
While iCloud email is a robust option for those deeply integrated into the Apple ecosystem, Neo offers a versatile alternative catering to a broader range of users. It stands out for its adaptability across various platforms, not just Apple products, making it an excellent choice for users who require cross-platform compatibility.
Key Features
- Cross-platform accessibility: Unlike iCloud Email, Neo is designed to work seamlessly across multiple operating systems, including Windows, Android, and iOS, ensuring accessibility no matter the device.
- Enhanced security measures: Neo highly emphasizes security, offering advanced encryption and secure data protection, ensuring your communication remains private and safe. This includes advanced anti-spam filters and two-factor authentication (2FA) to ensure the safety and integrity of user data.
- Customizable user interface: One of the standout features of Neo is its customizable interface, which can be tailored to individual preferences, improving productivity and user experience.
- Integration capabilities: Neo supports integration with various productivity tools and apps, making it a versatile choice for personal and professional use.
- Robust customer support: Recognizing the importance of timely assistance, Neo offers comprehensive customer support options, including live chat and email support.
- Adaptable for business and personal use: Neo is designed to cater to business and personal communication needs, with features and plans that scale according to user requirements.
- Innovative collaboration tools: Neo provides advanced collaboration tools for business users that enhance teamwork and project management.
7 Advanced Features for Businesses
- Last-minute corrections: The 'Undo Send' feature allows users to retract an email shortly after it's sent, ideal for correcting typos or last-minute changes.
- Customizable email templates: Streamlines responses to frequent inquiries, enhancing consistency and efficiency in communication.
- Engagement tracking: The ‘Read Receipts’ feature provides notifications when emails are opened and offers valuable insights into recipient engagement.
- Priority inbox: This smart feature organizes emails by importance, enabling users to focus on critical messages first.
- Strategic email scheduling: The 'Send Later' feature allows you to schedule emails optimally, enhancing the likelihood of timely responses.
- Follow-up reminders: Ensures important conversations are revisited, maintaining continuous engagement.
- Email and domain blocking: Empowers users to manage their inbox by blocking unwanted senders or domains, maintaining a clutter-free email environment.
Comparative Analysis: iCloud Email vs. Neo
iCloud Email Pricing Comparison with Neo
| iCloud Email | Neo |
|---|---|
| iCloud Free: 5GB storage | Business Starter: $1.75/month (one user) |
| Storage Plans: 50GB Storage: $0.99 per month 200GB Storage: $2.99 per month 2TB Storage: $9.99 per month 6TB Storage: $29.99 per month 12 TB Storage: $59.99 |
Business Plus: $3.49/month (one user) |
 |
 |
FAQs -Managing iCloud Email
1. How to Change iCloud Email?
To change your iCloud email, you'll need to change the primary email address associated with your Apple ID. Here's how:
- Go to appleid.apple.com and sign in with your Apple ID.
- In the Account section, click on "Edit" next to the Apple ID and Primary Email Address.
- Enter the new email address you want to use as your Apple ID.
- Follow the on-screen instructions to verify the new email address.
Note: The new email address cannot be already in use as an Apple ID.
2. How to Access iCloud Email?
You can access your iCloud email through several methods:
- On the web: Go to icloud.com and sign in with your Apple ID. Click on the Mail icon.
- On iOS devices: Open the Mail app. If it's your first time, you might need to add your iCloud account in the Settings under Mail, Contacts, Calendars.
- On Mac: Open the Mail app and sign in with your iCloud account if you haven't done so.
3. How to Check iCloud Email?
Checking your iCloud email is straightforward:
- Via Web: Visit icloud.com, sign in, and click on Mail.
- On iOS: Use the Mail app with your iCloud account configured.
- On Mac: Open the Mail app where your iCloud email should be set up already.
Ensure your device is connected to the internet to receive new emails.
4. How to Delete iCloud Email?
If you wish to delete your iCloud email address, you actually need to delete your entire Apple ID, as it's tied to your email. This action is irreversible and will result in loss of access to purchases and data associated with the account. Consider this action carefully and backup any important data.
- To delete your Apple ID, visit Apple's Data and Privacy website, sign in, and follow the instructions for deleting your account.
5. How to Change iCloud Email Name?
To change your iCloud email name, which is the name displayed when you send emails:
- On iOS: Go to Settings > Mail > Accounts > iCloud. Tap on the email account, then tap on the email address. Here, you can edit the name that appears in the "Name" field.
- On Mac: Open Mail, go to Mail > Preferences > Accounts. Select your iCloud account and change the name in the “Full Name” field.
6. How Do I Find My iCloud Email?
If you're unsure about your iCloud email address:
- On iOS: Go to Settings > [your name] at the top. Your iCloud email is listed under your name.
- On Mac: Open System Preferences > Apple ID. Your iCloud email is displayed under your name.
Conclusion
While iCloud Email offers a streamlined and integrated experience for Apple users, its limitations in cross-platform accessibility and customization are evident. On the other hand, Neo provides superior cross-platform compatibility, customizable interfaces, and advanced features tailored for personal and business use. With its robust security measures and exceptional customer support, Neo stands out as a compelling choice for those seeking a more adaptable and feature-rich email solution. Ultimately, your choice between iCloud Email and Neo should align with your needs, whether you prioritize seamless integration within the Apple ecosystem or desire a more flexible and comprehensive email service.
Get Business Email
No domain name required
Business Email
With a Free Domain