


.svg)
.svg)


Get Business Email
No domain name required

How to Change Outlook View?
Regardless of whether you use Outlook for business or personal projects, it's critical to configure the Outlook view to optimize efficiency and productivity. But not every user would find the default view in Outlook ideal—different jobs require various layouts.
Fortunately, Outlook makes it easy to adjust your views to fit your requirements and tastes better. One of the easiest ways to take charge of your email experience is to change the way Outlook appears.
For many people, the default Outlook view is sufficient, but you might wish for something more. Maybe you want a calendar-style display to help you organize your schedule, or maybe you need additional screen real estate for reading messages.
Outlook allows you to change how it displays emails, contacts, and calendars so you may interact with it in a way that best suits your needs.
In this article, we'll look at the many view layouts that Outlook offers, along with a step-by-step guide on how to change Outlook view. By learning to tweak this function, you can make the most of your workday and increase productivity.
What are the Different Types of Layout Available in Outlook?
When you open your Outlook account through a personalized email address, the default view of Outlook is Compact. Nonetheless, you can utilize multiple views or layouts that Outlook offers for different folders. Depending on what information you want to view and how you want it organized, each style offers benefits and drawbacks.
Let's look at some of the most popular Outlook layouts.
1. Table
This view lists your emails in rows and columns. It lets you quickly view the sender, subject, date, size, and other data of each message. Moreover, you may organize, filter, sort, and arrange your messages according to any column.
2. Timeline
This view displays the information in a timeline format. For example, when working on a project, you may view a list of emails that are chronologically arranged from the start to the finish. Every item's creation, modification, due date, and completion are all visible.
3. Card
The card layout shows all the products in a card view along with their subject and symbol. This view is helpful for folders with fewer items or folders containing notes. Each item's summary is visible without having to open it.
4. Business Card
Similar to the card view, the business card view shows your contacts' names, photos, and other information. It provides you with more information about each contact when we compare it to the card view.
5. People
The People view provides a compact view that displays your connections' names, photos, and contact folders. With this layout, you may see more contacts with respect to the business card view.
6. Day/Week/Month
This view displays the items on your calendar in a grid style. You may view your projects, events, meetings, and appointments over several time periods.
How to Change Outlook View?
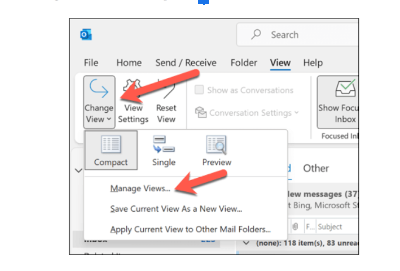
Using the built-in views is the simplest method to alter the display of an Outlook folder. You may select any of these preset views from the View tab's drop-down menu.
Let's understand the steps to modify how an Outlook folder appears.
Step 1: Open Outlook
To begin, double-click the Outlook icon to launch Microsoft Office on your device. Depending on where you put it on your device, you can find it on your taskbar, desktop, or Start menu.
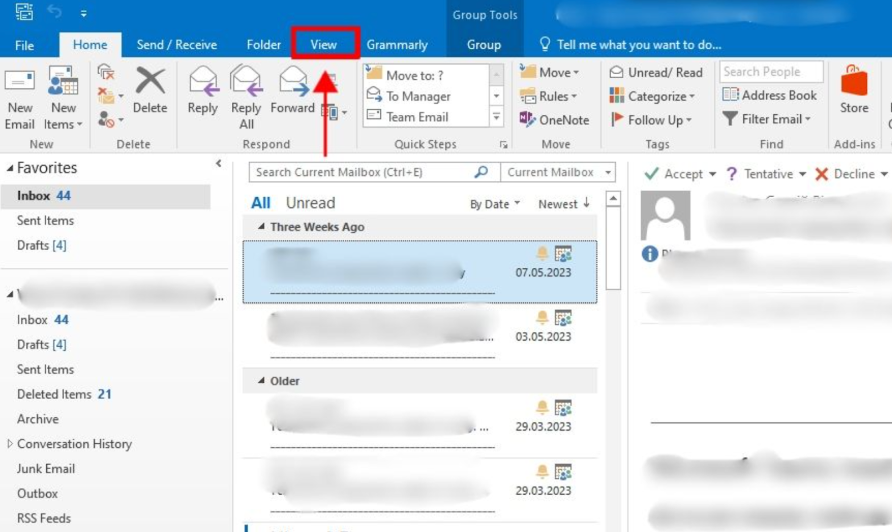
Step 2: Select the View Tab
When Outlook opens, a number of menu options will appear at the top of the screen. Click on the View tab. This page has settings for the appearance of your emails.
Step 3: Choose Your View.
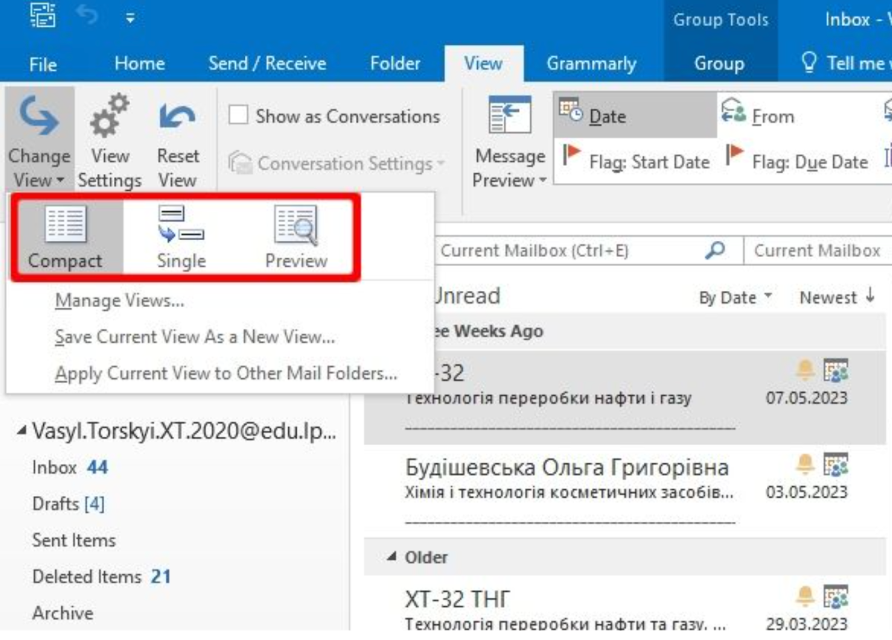
Click on the Current View Section. Your emails will appear in this panel with pre-configured displays. The choices for different email folders are:
- Compact: This arrangement uses minimal space. It fills your screen with additional messages but only shows the pertinent information for each email. This is a helpful view if you value quantity over detail.
- Single: This view fills your screen with just one email at a time, as its name implies. It works well if you'd rather read your emails in a quiet place without interruptions.
- Preview: This view gives you a quick look at the content of your emails. Each message only displays a small portion of its information, so you can determine from the preview whether or not it is worthwhile to open. When you have a lot of emails to review for your multiple accounts in Outlook, this view might help you save time.
Besides, you can choose the Day/Week/Month for calendar folders.
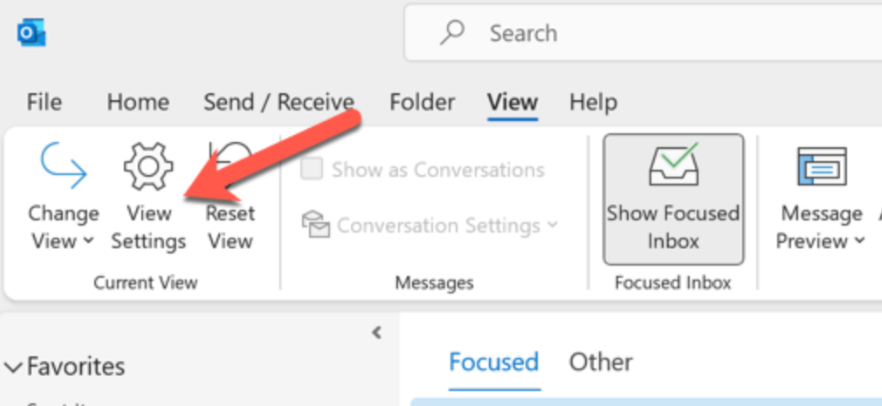
Step 4: Customize the View.
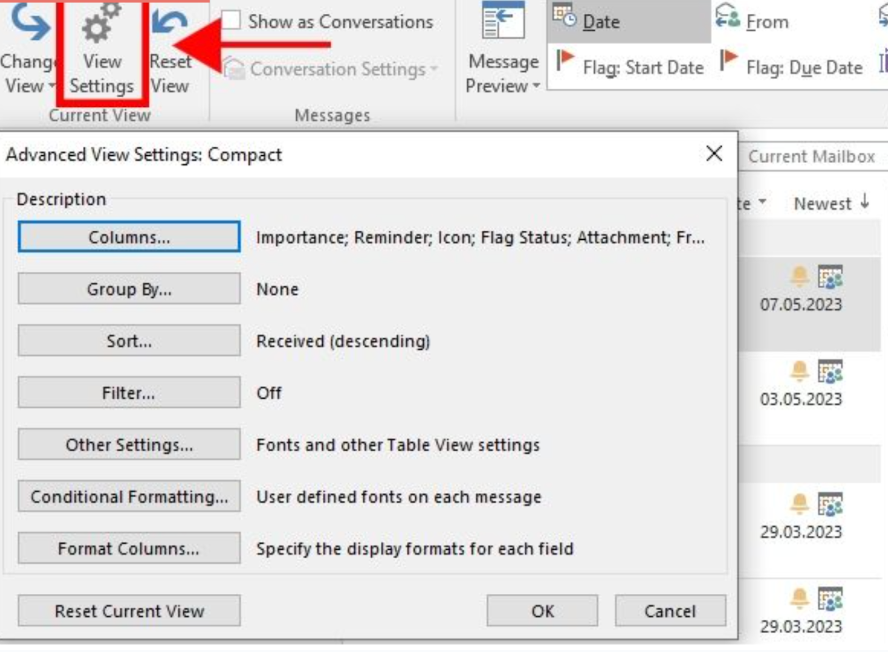
You may alter the email view if the preset settings aren't suitable for you. Click the View Settings button in the Current View window to accomplish this.
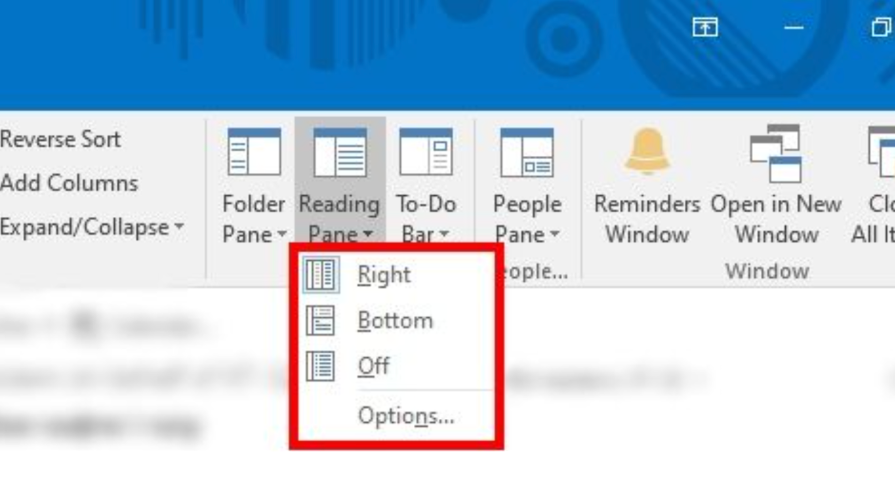
Step 5: Modify the Reading Pane.
The chosen email's content appears in the Reading Pane. To turn it off or modify its position, you should:
- Open the "View" tab and select the "Layout" panel.

- Select "Reading Pane" by clicking on it.
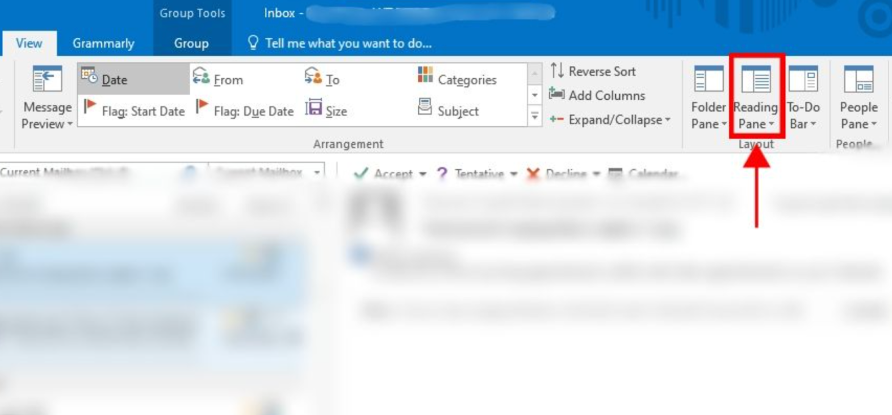
- Now, you may choose "Off" to completely disable the Reading Pane, "Bottom" to display it underneath the email list, or "Right" to display it to the right of the email list.
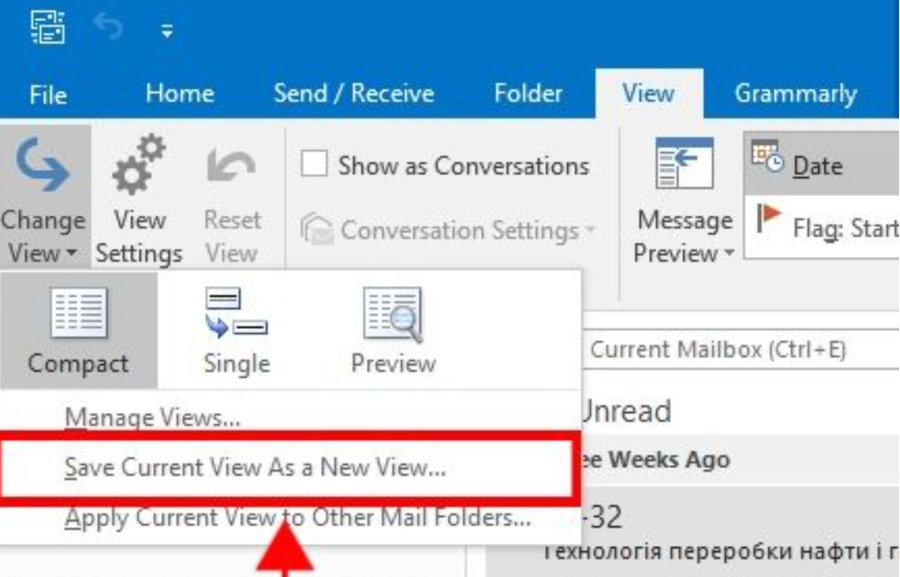
Step 6: Save Your View.
You can save the new view for future use if you like the changes you've made. To do this:
- Go to the Change View drop-down menu in the Current View panel.
- Click on the Save Current View as a New View option.
- Give your new view a name, and then click OK.
How to Customize Your Outlook View?
You may change different settings and parameters to personalize your view if none of the built-in views work for you with the customization option. You may start from scratch and build a new view or edit an existing one.
To personalize your Outlook display, take the following actions:
- Navigate to the Outlook folder you wish to alter.
- Select the View tab on the ribbon.
- Select the Current View group and click the View Settings button.
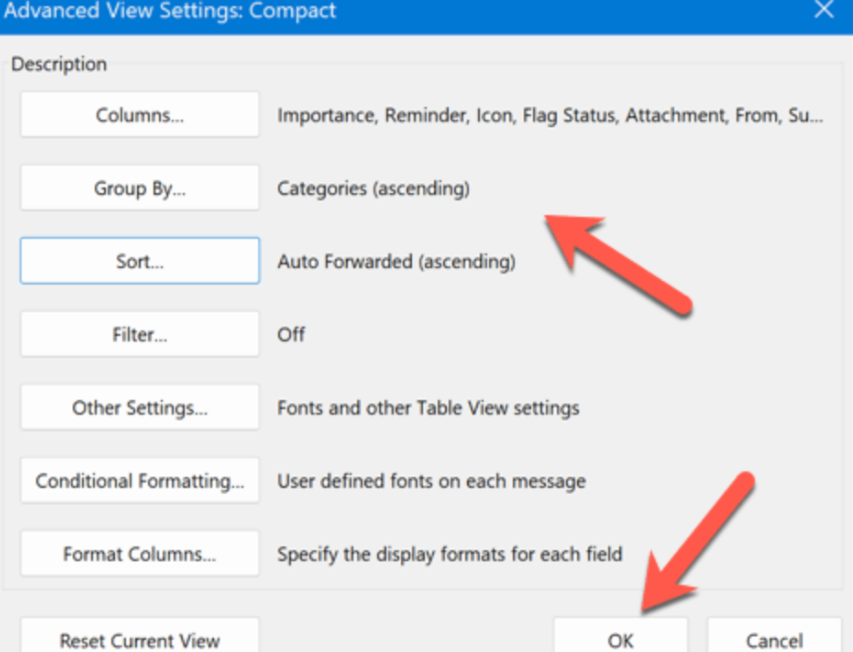
You can adjust a number of view-related parameters and choices in the Advanced View Settings dialog box that displays, including;
1. Columns
The columns that show up in your table view can be added, removed, or rearranged.
2. Group By
You can arrange your items in either ascending or descending order based on any column or field.
3. Sort
You may arrange your items in either ascending or descending order based on any column or field.
4. Filter
You can apply particular criteria to your products.
5. Format Columns
You can modify the font, alignment, width, and color of any column.
6. Conditional Formatting
Depending on factors like significance, category, or flag status, you may format your items differently.
7. Other Settings
You may modify other options for your display, including the reading pane, grid lines, font style, and size, and item spacing.
How to Add a New View in Outlook?
You may create a new one from the start instead of altering an already-existing view. Follow the following steps to add a new view in Outlook in addition to the preset ones:
- Open the Outlook folder for which you need to create a new view.
- Click on the View tab.
- In the Current View group, click on the Change View button.
- From the drop-down option, choose Manage Views.
- Click New in the Manage All Views dialog box that pops up.
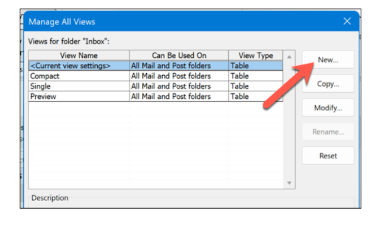
- Name your new view and select the kind of view you wish to establish. Additionally, you may choose which folders your view will be applied to.
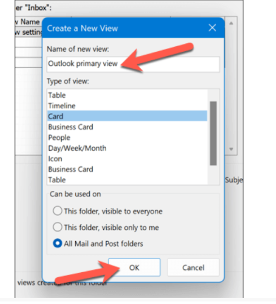
- Click OK to move forward and access the Advanced View Settings dialog box for your newly selected view.
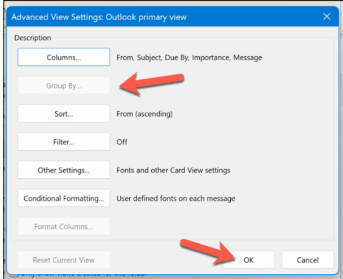
- Make your view fit your needs by adjusting the available settings.
- After customizing your view, click OK to save your modifications and apply them to your folder.
- Select OK in the Manage All Views dialog box to save your preferences.
8 Quick Tips for Optimizing Your Outlook View
Now that you know how to change the various display styles in Outlook selecting layouts based on the jobs you do most frequently is critical. Try out the different settings to see which one best suits your workflow.
Here are some more pointers for making the most of your personalized Outlook views:
- Set aside a view for email only. Use a list view or normal view to keep your inbox organized. Put the calendar or reading pane on hold for another job.
- Make use of several perspectives. For instance, when writing, utilize a reading window; when quickly skimming, switch to a list view. Additionally, you can have separate displays for your work and personal accounts.
- Utilize the view filters feature. To better arrange emails by category, flag status, or other criteria, create filters. It facilitates the management and discovery of certain message kinds.
- Modify the folder pane. In views where folder navigation is not required, minimize or conceal the folder pane. It makes the most of the screen real estate.
- Set up views according to teams. Establish consistent perspectives and allocate them to various departments. It maintains uniform procedures throughout groups.
- Synchronize views between devices. Establish consistent, personalized views across all your gadgets: laptop, phone, tablet, and desktop.
- Examine a project timeline view. The timeline view is perfect for organizing projects and deadlines since it arranges activities and events in a linear format.
- Selecting views that facilitate your unique processes is essential for being an effective Outlook user. To get the most productivity out of your views, explore and fine-tune them.
The Bottom Line,
Investing in the effort to personalize your Outlook views will pay off in terms of increased productivity and improved workflow efficiency.
Whether you are an administrator trying to standardize processes across a team or a single user managing a lot of tasks and deadlines, having complete control over Outlook's features and style with customizable views guarantees the software is tailored to your unique requirements and tastes.
While the default layout could be enough for simple email management, more customized settings can be made by examining the options to change various components such as the toolbar, folder pane, and filters.
We've gone over the many view styles that are available and how to change Outlook view. Now, you can easily try out different configurations and layouts until you identify an interface that makes your everyday tasks go more smoothly.
Frequently Asked Questions
1. How do I change my default view?
Navigate to File > Options > Advanced to establish a default view. Choose the view, such as the Calendar that you wish to use every time you launch Outlook under "Default Mail View." Outlook will now open with this view loaded automatically.
2. Can I customize the toolbar and ribbon?
Yes, you can alter which buttons show up on the ribbon and toolbar in each view. Choose "Customize Ribbon" with a right-click on a space. You may then modify this to add, delete, and rearrange buttons to suit your unique activities and processes.
3. How do I create a custom view?
Go to View > View Settings > Arrange By > More Views to build a custom view. Name your new view and choose its layout, including which panes appear on the screen. After that, the Views drop-down menu will allow you to access this custom view.
4. Can I sync my views across devices?
Indeed! Outlook allows you to synchronize your desktop and mobile display modifications. Ensure that you have configured your account in Outlook's syncing settings. Modifications done on one device—such as concealing or reordering panes—will be reflected on other devices that are connected.
5. How do I switch between views quickly?
Using keyboard keys or the Views drop-down menu is the quickest method to switch views. Common keys are Ctrl+2 for the Reading Pane and Ctrl+6 to move to the Calendar pane. Additionally, you may choose a different layout from the menu by right-clicking the name of the active view in the status bar.
Get Business Email
No domain name required