


.svg)
.svg)


Get Business Email
No domain name required

Introduction
Microsoft Outlook remains committed to offering a dependable and robust platform for managing emails, appointments, contacts, and more in personal and professional communication. The user-friendly interface and abundant valuable tools make it a preferred choice for individuals and organizations. Selecting and managing multiple emails is a necessary task to enhance work productivity. We present a comprehensive guide to explore the various techniques available within Microsoft Outlook for selecting multiple emails.
Selecting Multiple Emails in Outlook
You receive over 100 messages daily in your email inbox. This calls for efficient email management, which Microsoft Outlook can easily do. Fortunately, for anyone who wants to know how to select emails in Outlook, the platform offers effortless inbox cleaning by selecting multiple messages or choosing all messages that match certain criteria.
How to Select Multiple Emails in Outlook
In Outlook, you can choose the Ctrl and Shift keys on your keyboard, choose multiple emails individually, select a group of emails, or select all emails simultaneously. The methods apply to the Outlook Windows client and Outlook for the Web (OWA). Some commonly used approaches to select multiple emails in Outlook are:
To select various emails individually:
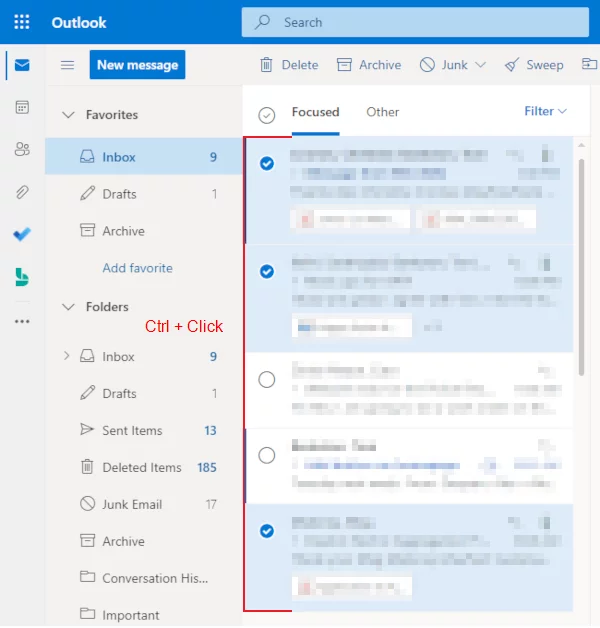
1. Hold down the Ctrl key on your keyboard
2. Click each email you wish to select
3. Release the Ctrl key
To choose a batch of emails:
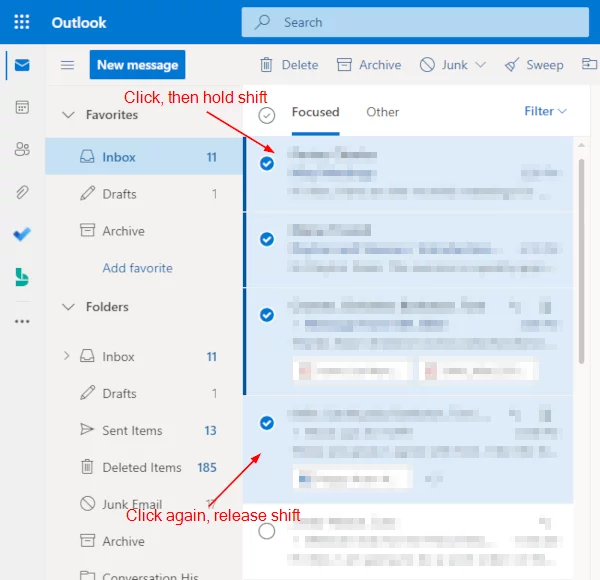
4. Click on the initial email you want to select
5. Press and hold the Shift key on your keyboard
6. Click on the last email you want to include in the selection
7. Release the Shift key and done
To choose all emails in your inbox or a folder, utilize the select-all keyboard shortcut:
- For Windows: Ctrl + A
- For Mac: Command + A
This shortcut efficiently selects every email currently visible in your view. In Outlook for the Web, you can also click the Checkmark icon above your emails to select all emails in the current view.
Bonus: Selecting Multiple Emails in the Outlook Mobile App
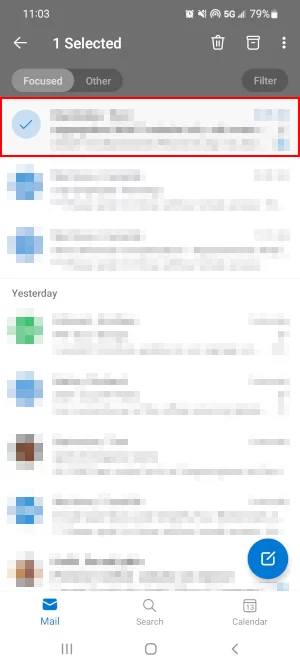
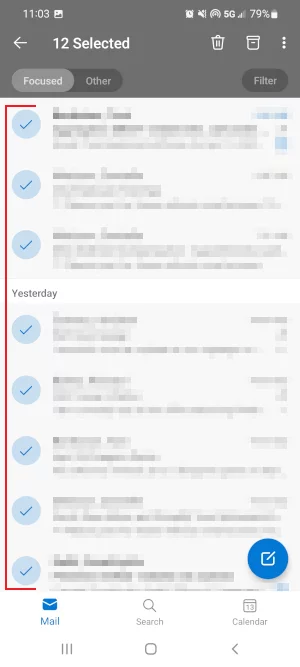
To choose multiple emails in the Outlook mobile app, perform a long-press (tap and hold) on any business email until you see a checkmark appear to the left. Subsequently, tap each email you intend to select.
Alternatively, you can tap the profile picture or icon to the left of each email you wish to choose. Follow these step-by-step instructions:
- Open the Outlook mobile app and sign in to your account
- While in your inbox, initiate a long press (tap and hold) on any email until a checkmark appears to the left of it
- Tap each email you want to choose. You can also efficiently select multiple emails by swiftly swiping down right after the checkmark appears during a long press.
There are several options to select multiple emails in Outlook. Let us dive into them:
- Using the Shift key:
- Hold down the Shift key from your keyboard and click on the first email you want to select
- While still holding the Shift key, click on the last email in the list to select all emails in between
- Using the Ctrl key for inconsecutive emails:
- Hold down the Ctrl key and use your mouse to click on each email you want to select individually
- This is useful for choosing non-consecutive emails scattered throughout your inbox
- Quick Access Toolbar option:
- In the Quick Access Toolbar, you can find a button that allows you to select all emails in the folder
- Simply click on this button for a professional and shortcut-free approach to selecting all emails
- Checkbox method (old version):
- In older versions of Outlook, checkboxes are provided next to each email in the inbox.
- Hover over an email, and a checkbox will appear to the left.
- Click on the checkboxes for each email you want to select, making it a mouse-centric method.
Advanced Techniques for Email Selection
In Microsoft Outlook, mastering advanced techniques for email selection can significantly increase your efficiency and help streamline your email management. Outlook automatically places newly received emails at the top of your inbox, but you can adjust the order. You also have the option to sort emails based on the sender or subject. Here's how to do it:
Sorting and filtering a mailbox in Outlook
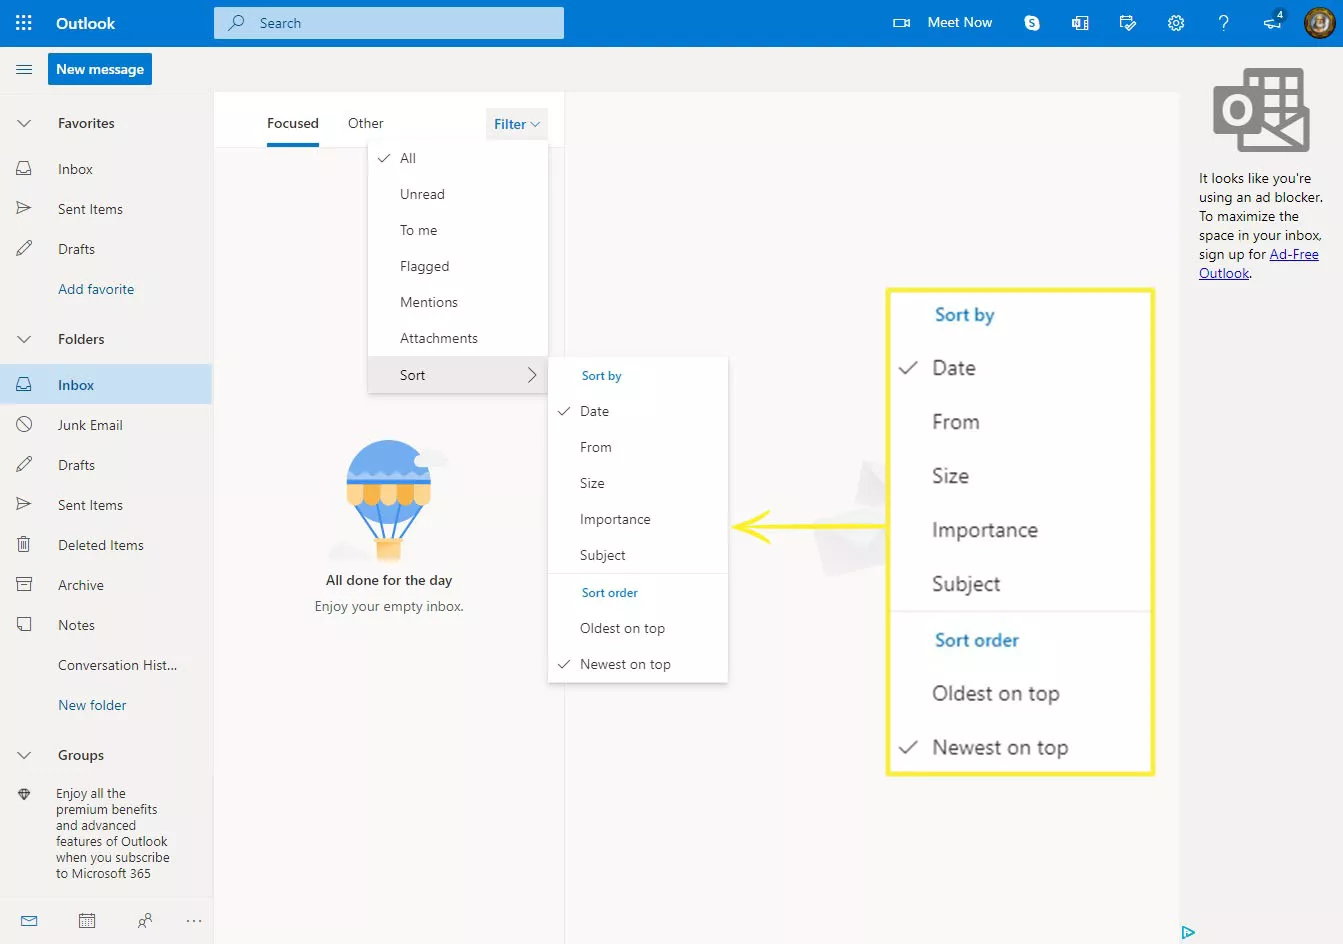
Utilize the Microsoft Outlook filter system to modify the sequence of emails in your Inbox.
- Open your Inbox and locate the "Filter" option. It is present at the top of the window.
- Click on "Filter" and select "Sort."
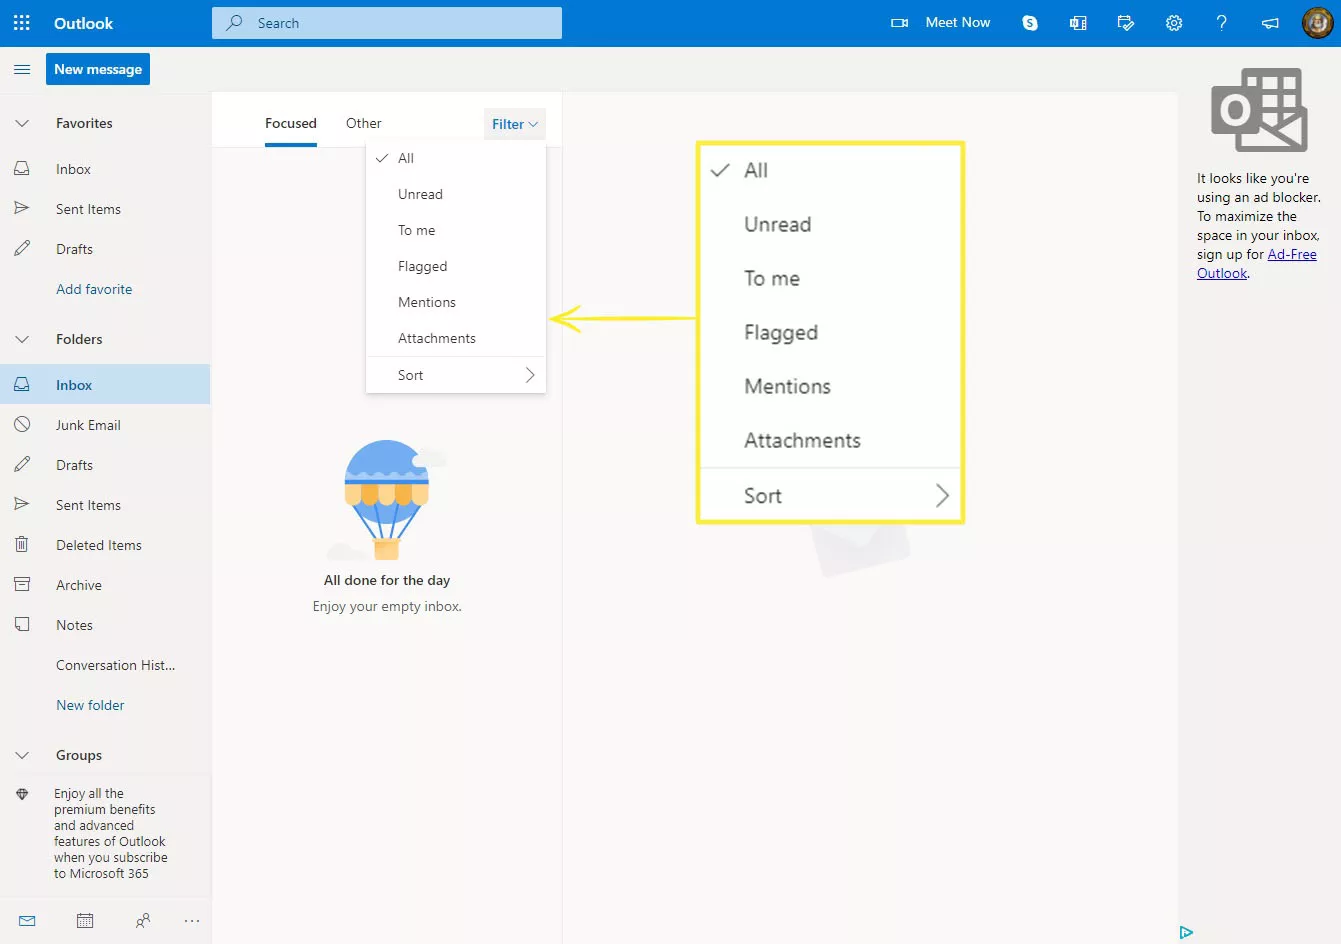
- Choose a sorting preference. You can sort your emails by date, sender, size, importance, or subject. Additionally, you can arrange emails so that either the oldest or the newest appears on top.
Sorting the folder list in Outlook
You can create a favorites list in Outlook and simplify organizing your frequently accessed folders.
- Navigate to the left of the Outlook window, where your folders list is located. Right-click on a folder and select "Add to Favorites." The folder selected is now included in your favorites list.

- In your favorites list, you need to right-click a folder and select either Move Up the list or Move Down the list. This feature lets you list your favorite folders in your preferred order.
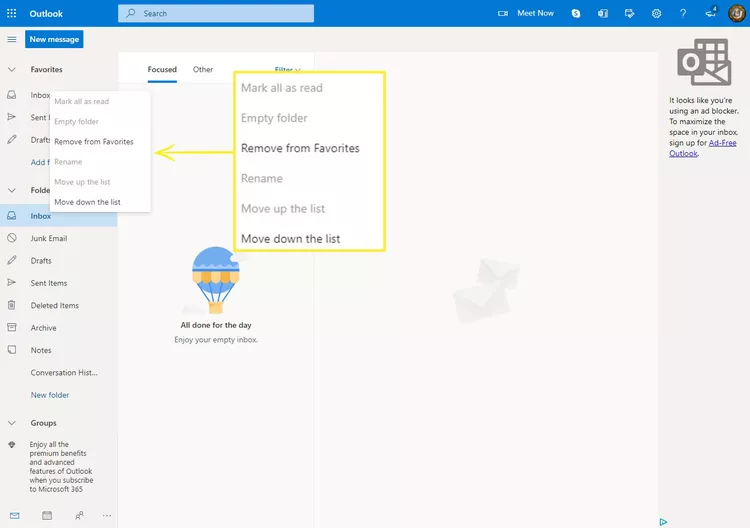
- To remove folders from your favorites, right-click the folder and select “Remove from Favorites.”
Using rules and filters to group emails
If you need more time, you can create rules to organize emails on Outlook. A rule created will run on every new email in your inbox. Additionally, you can apply the rules to the existing emails in your inbox. Outlook rules only apply to emails in your inbox and not other folders.
Let us look at the steps to create rules to organize Outlook emails.
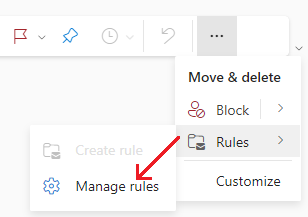
- Click the three dots on the right-hand side of the screen in Outlook email. This opens a More options bar.

- Select Rules and click on Manage Rules.
- Click + Add new rule.
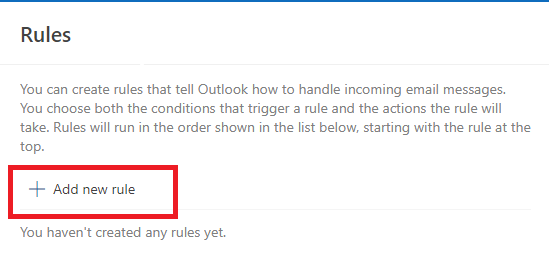
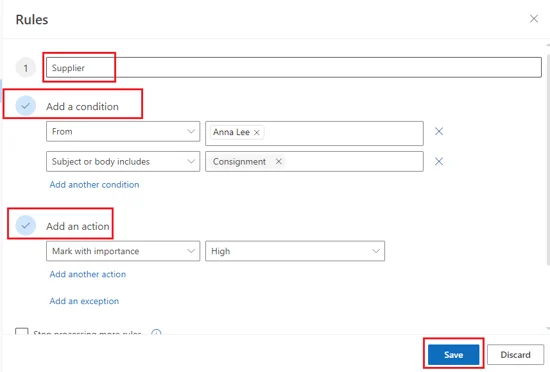
- A new dialog window opens up. Add the rule name, conditions, and actions, and then click Save. Whenever you receive an email meeting those conditions, Outlook will automatically run the rule.
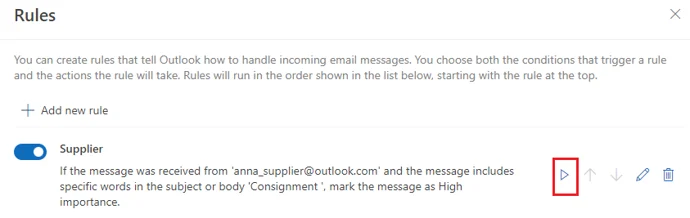
Let us now dive into the steps to run a rule to existing emails in the inbox.
- Click the three dots present on the right side of your Outlook email. This opens up the More options.
- Select Rules and click Manage Rules.
- Click the Run icon present next to the rule name on the screen. The rule only applies to emails in your inbox.
Organizing and Managing Selected Emails
Outlook offers a great range of features that help facilitate the organization of your email. Let's delve into these features in-depth.
Outlook Folders
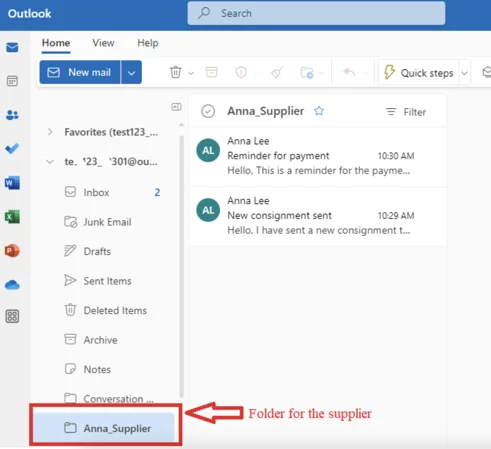
One effective email organization method in Outlook is creating folders based on diverse criteria. The emails can be categorized by moving them into specific folders, which can be established for distinct purposes, such as:
- Contacts
- Subject lines
- Departments
- Keywords
Categories
In Outlook, there is scope to organize emails within a designated folder using categories. You can further categorize the emails within a particular folder, such as distinguishing between payment and consignment notifications.

Rules
Outlook allows establishing "rules" for automatically sorting emails into designated folders. The conditions to configure such rules include
- Sender's email address
- Email subject line
- Size of the email
- Whether you are a direct recipient or in the CC field
- Email date
- Email content

Optimizing Productivity with Selected Emails
Microsoft Outlook offers powerful features beyond mere email management and allows users to optimize productivity by seamlessly integrating selected emails with tasks and calendar events. Additionally, collaborative tools and sharing options help enhance teamwork and communication efficiency.
Integrating Selected Emails with Tasks and Calendar
Outlook enables seamless integration between selected emails, tasks, and calendar events to create a streamlined workflow. Here's how to use them:
- Task creation: To convert important emails into actionable tasks, right-click on the email, select "Create Task," and set due dates, priorities, and reminders. This transfers crucial information into actionable items on your task list.
- Calendar events: You can also create calendar appointments for time-sensitive emails or events mentioned in emails. Highlight the relevant email content, go to the "Home" tab, and click "New Items" followed by "Appointment." This is used to convert email details into scheduled events on your calendar.
Collaborative Tools and Sharing Options
Outlook fosters collaboration through various tools and sharing options, aiding in teamwork. These tools include:
- Calendar sharing, which helps coordinate schedules. To share the chosen calendar, click the "Share Calendar" option and specify permissions.
- The email forwarding and sharing feature lets you share selected emails with colleagues. To share, right-click on the email, select "Forward," and send it to relevant team members.
- Collaborative editing lets you share attachments, collaborate on documents, and make simultaneous edits without the need for back-and-forth emails.
The collaborative tools and sharing options enhance efficiency, organization, and teamwork, ultimately optimizing productivity in the Microsoft Outlook environment.
Best Practices for Streamlining Email Workflow
You must streamline your email workflow in Microsoft Outlook for efficiency and productivity. Proper time management and maintaining a clean and organized inbox is key.
Time Management Tips for Handling Selected Emails
- Prioritizing your inbox can save a lot of time. Flag important emails for quick identification.
- Addressing emails instantly prevents small tasks from piling up and consuming more time later.
- Organize emails by creating folders and assigning categories to emails based on projects, urgency, or topics.
- Minimize distractions by unsubscribing from newsletters or promotional emails that are not relevant.
- Setting specific email slots helps avoid constant interruptions and maintain focus on other tasks.
- Using Outlook's Quick Steps automates common tasks like moving emails to specific folders or forwarding them to colleagues.
Maintaining a Clean and Organized Inbox
- Implement the Inbox Zero approach by regularly clearing out unnecessary emails.
- Create rules to automatically sort incoming emails into designated folders based on criteria like sender, subject, or keywords.
- Archive completed projects to an archive folder to keep your primary inbox uncluttered.
- Schedule regular inbox reviews. Delete or archive old emails and assess existing folders and categories.
- Use Outlook's advanced search options to locate specific emails quickly.
- To prevent your inbox from being flooded with irrelevant messages, refrain from unnecessary CCs and "Reply All" responses.
Conclusion
Selecting multiple emails in Outlook is a fundamental skill that can significantly boost your efficiency and productivity and enhance digital communication. The process is intuitive and adaptable and suits specific needs. Outlook's built-in features, like the Shift and Ctrl keys, make selections more dynamic. Moreover, incorporating these skills into your routine saves time and contributes to a more organized and streamlined email management system. You must stay informed about updates and enhancements to refine your email selection process further. This will help you navigate your inbox more easily and effectively, leaving you more time to focus on what truly matters.
Get Business Email
No domain name required