


.svg)
.svg)


Get Business Email
No domain name required

Keeping your inbox clutter-free while maintaining access to old emails is easy with Gmail's archiving system. Unarchiving the archived email restores that message to your inbox or any other folder if you want to find an archived email again.
This guide outlines the quick steps on how to unarchive in Gmail, whether it's a single email or multiple emails, using search, filters, labels, and more. With our comprehensive guide, you can ensure that your important conversations will always be retrievable, even after archiving.
Understanding Gmail Archives
When you archive an email in Gmail, it gets removed from your inbox and other default folders, such as Sent Mail and Drafts. Archived emails are stored under the 'All Mail' folder, which contains every email you have ever sent or received, including archived messages. Therefore, archiving emails doesn't delete them; it simply removes them from your inbox, promoting a cleaner, clutter-free inbox, especially if you have a business Gmail account. Archiving the email is the best way to visit or open the email again by unarchiving it.
Archiving emails in Gmail is easy, just like opening a business Gmail account. Here are the steps to archive emails:
Step 1: Find an email that you want to archive.
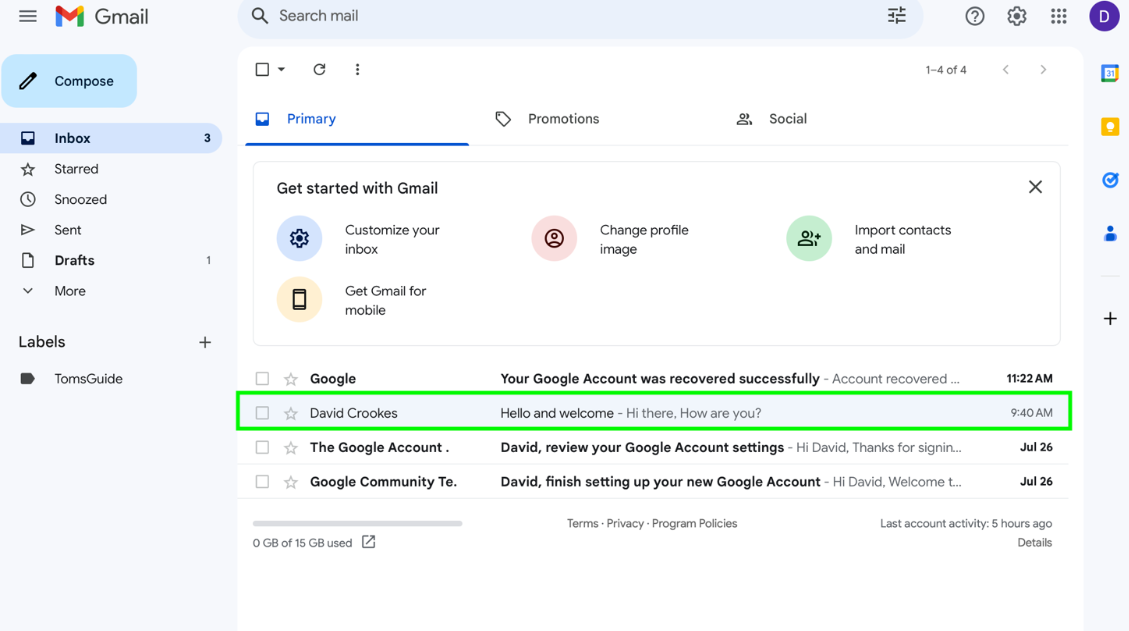
Source: Tom’s Guide
Step 2: Select the mail and click the archive button, the leftmost icon of all four.
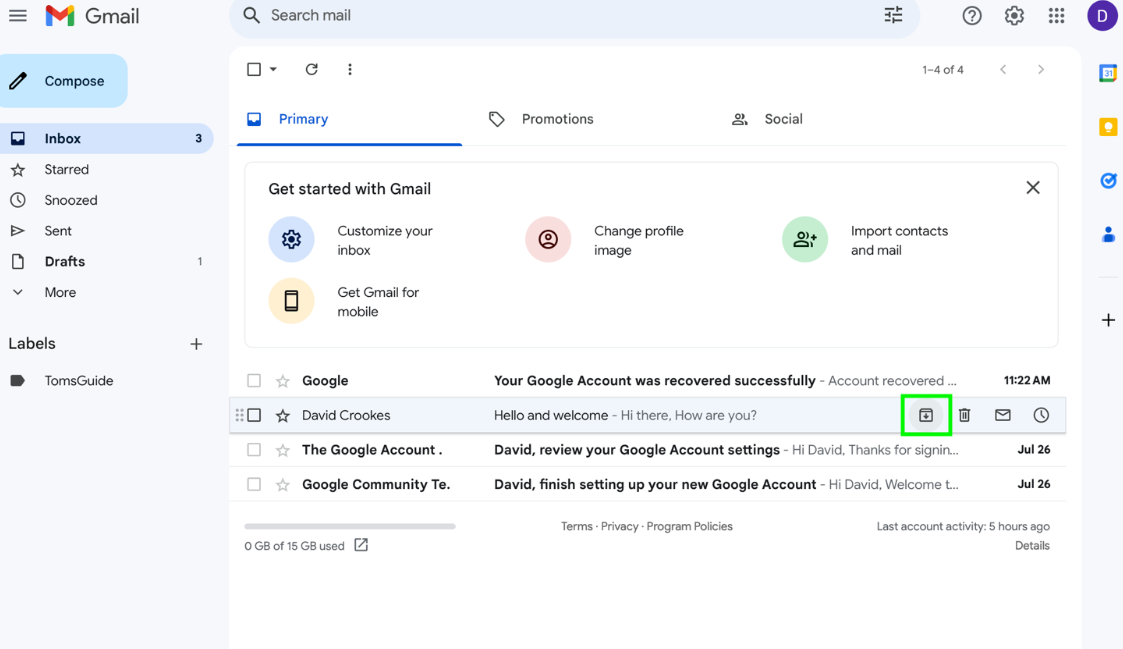
Source: Tom’s Guide
Step 3: The email will vanish from your inbox, and you can undo it if it happened accidentally.
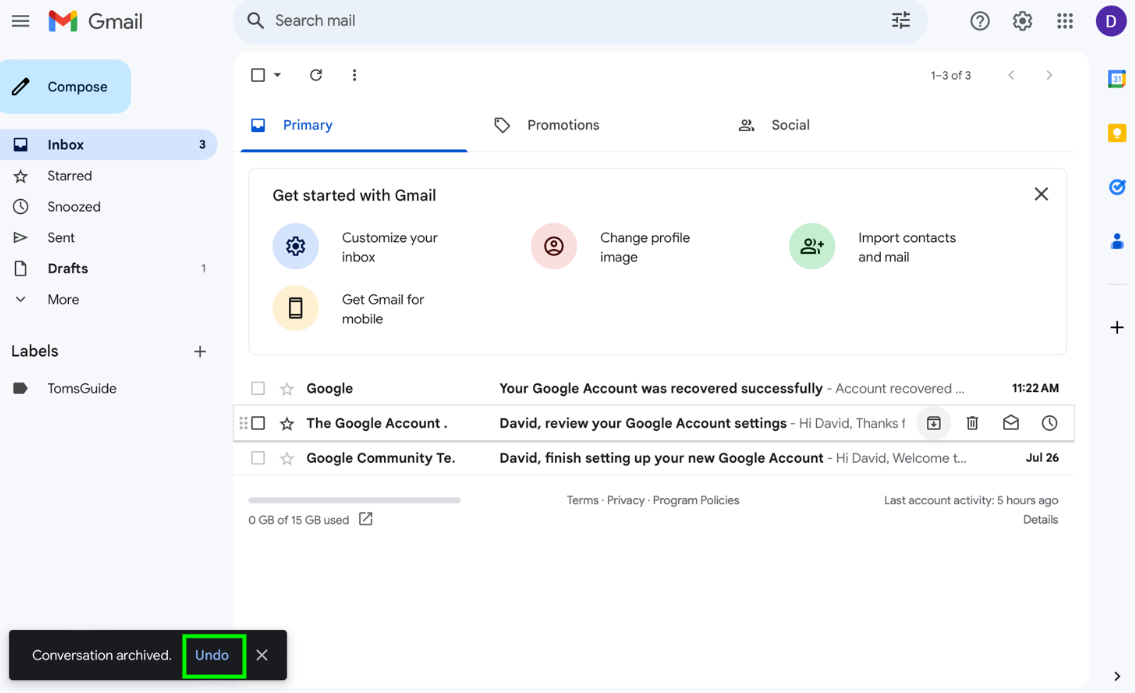
Source: Tom’s Guide
However, you must be quick to undo it; otherwise, you’ll have to unarchive it manually.
Why You May Want to Unarchive Emails?
Here are some common reasons why you would want to unarchive emails in Gmail:
- You require a follow-up on an older conversation: if you have archived an email thread you need to reopen, you can unarchive it to your inbox.
- You made a mistake in archiving important messages: sometimes, you may accidentally archive an important or unread email that should have stayed in your inbox.
- You are looking for old information: even though archived emails are searchable, you may want to return certain messages to your inbox for quick access or as a reminder.
- You decluttered too extensively: excessive archiving can push emails you still need access to into the depths of All Mail.
- There is a change in priorities: what wasn't important before is your top priority now.
- You require attachments/documents: you may have archived an email containing an attachment you now need access to.
- You want to revisit previous conversations: you may need to unarchive old email exchanges to prepare for a meeting or follow-up.
How to Unarchive a Single Email?
Unarchiving a single email is remarkably simple. It just takes a few seconds and three clicks, enabling you to retrieve important archived messages instantly. Follow these steps to learn how to unarchive in Gmail:
Step 1: Open Gmail and navigate to the 'All Mail' folder, where all archived messages are stored.
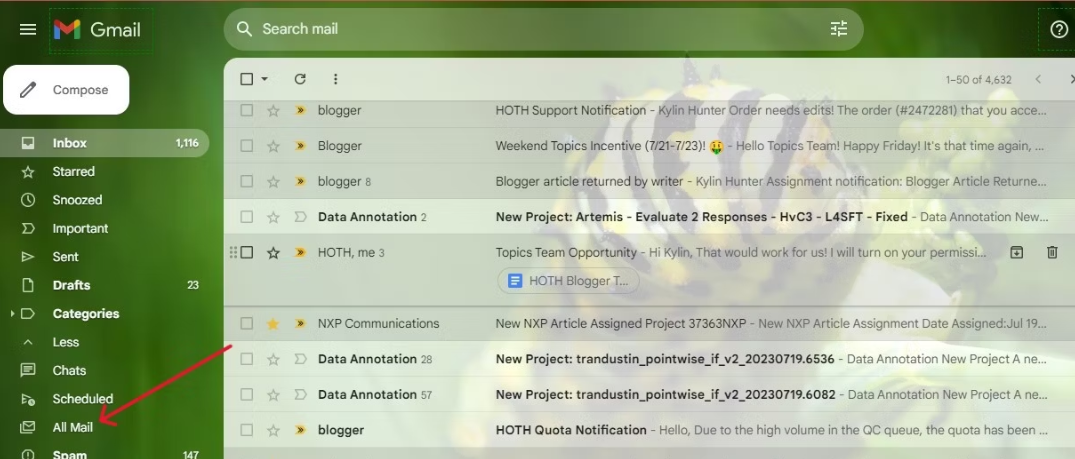
Source: Android Police
Step 2: Use the search box to find the archived message you want to unarchive. You can search by sender, keyword, date, or filter.
Step 3: Open the email you wish to unarchive.
Step 4: At the top, above the email content, click the 'Move to Inbox' icon, resembling an arrow pointing left towards an inbox.
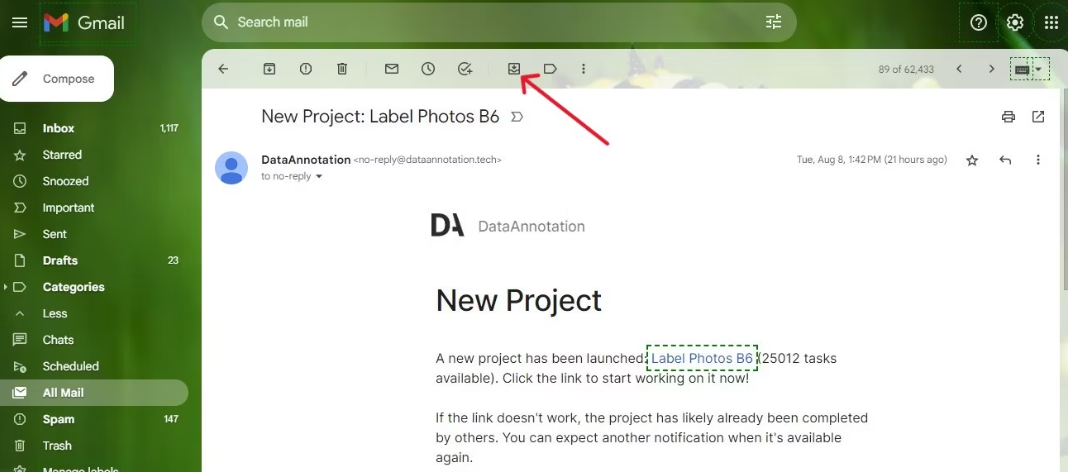
Source: Android Police
Step 5: The email is now unarchived and moved back to your inbox for quick access.
Step 6: You can move the email to any other folder by clicking the folder icon next to “Move to Inbox.”
Unarchiving Multiple Emails in Bulk
If you need to bring back a batch of archived emails to your inbox, Gmail can unarchive them in bulk. Understanding how to unarchive in Gmail in bulk is useful when you need access to an entire project or conversation thread again, without the need to unarchive each email individually. Here are the steps you can follow to archive emails in bulk:
Step 1: Go to ‘All Mail’ and use the search option or advanced filters to find the archived emails.
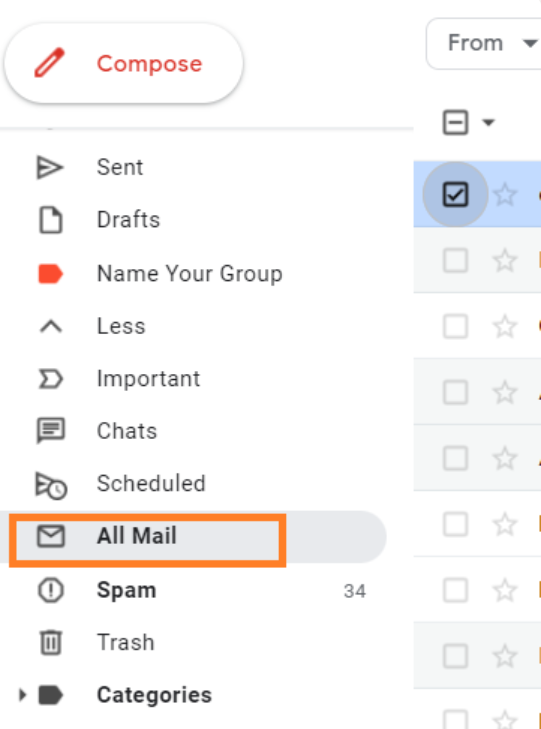
Source: YAMM (Yet Another Mail Merge)
Step 2: Select all the emails you want to unarchive by checking the box beside each.
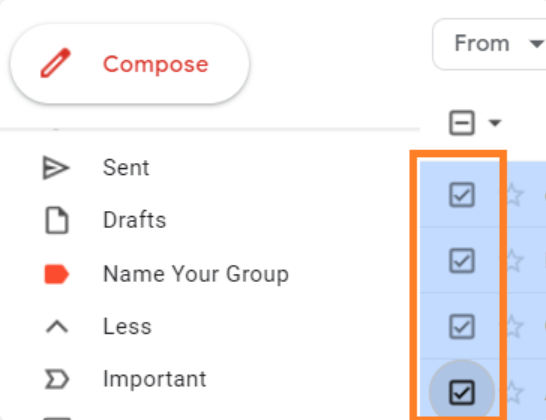
Source: YAMM (Yet Another Mail Merge)
Step 3: Click the arrow icon at the top and choose 'Move to Inbox' from the dropdown menu.

Source: YAMM (Yet Another Mail Merge)
Step 4: All selected emails will be moved back into your inbox.
There are a few things to note when unarchiving multiple emails together:
- There is no limit to how many emails you select to unarchive at one particular time. However, you can select 50 emails simultaneously because a page displays only 50 emails at a time by default.
- You can only select single conversations from one folder at a time.
- All selected emails will be placed in a specific destination folder.
Unarchiving Emails From Search Results
Gmail's search function is incredibly powerful, allowing you to locate archived messages even years later. Moreover, you can directly unarchive emails from the search results. This feature makes retrieving important emails you've stashed away in your archives convenient. Follow the steps given below to unarchive the email from the search results.
Step 1: Type keywords into the Gmail search to find your desired archived messages. You can combine one or more search operators to display specific archived messages and in:inbox operator. Here are some advanced operators that you can use to simplify your search:
- Use has:nouserlabels if you want to find archived emails with no labels.
- Use label:<label_name> to search for an archived email with a specific label, like label:AccountingDepartment.
- Use from:<sender_name or email_address> to find archived emails from a specific user or email address, like from:David or from:someone_01@gmail.com
- Use “specific word or phrase” to find emails containing the exact word or phrase, like “cashback.”
- Use older_than:<number_of_days/months/year><d/m/y> to find archived emails before the mentioned period, like older_than:5m will retrieve all the mails five months from the current time.
- Use has:attachment to find archived emails with attachments.
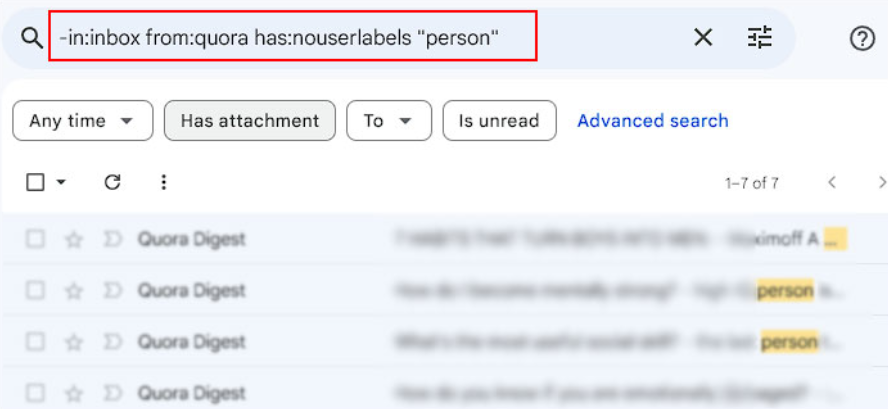
Source: Inside the Web
Step 2: In the search results, check the boxes beside each email you want to unarchive. If you want to select multiple adjacent emails, click on the checkbox of the first email and then click on the last email while pressing the Shift key. It can even help to delete emails in bulk in Gmail.
Source: Inside the Web
Step 3: You can even select all the emails on a single page at once by clicking on the topmost checkbox in the top left corner. You can use this for deleting promotion emails as well.
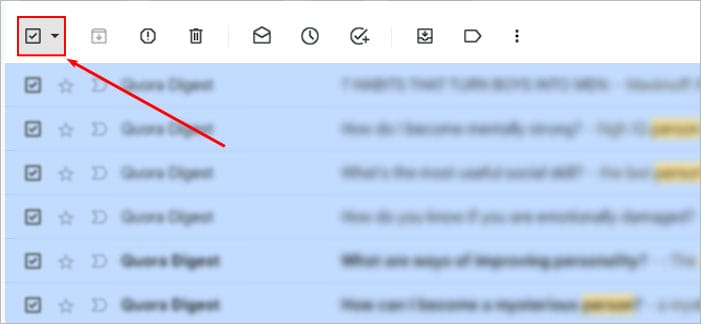
Source: Inside the Web
Step 4: Click the 'Move to Inbox' option below the search bar.
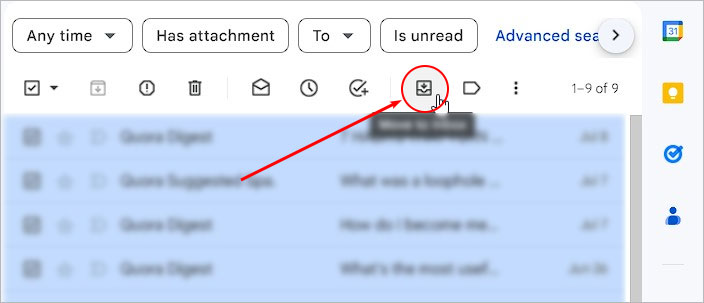
Source: Inside the Web
Things to consider when unarchiving emails from your search results:
- Search all folders, including All Mail, to find archived messages.
- Only emails from the same search results can be unarchived together.
- Use advanced search operators for more precise results and unarchiving. However, separate each operator with a single space character using multiple search operators.
- Unarchiving works for emails archived years ago as long as they exist in All Mail.
Unarchiving emails from search allows precise access to important conversations you need from the past. Your search skills will help retrieve the exact messages to restore.
Troubleshooting Tips When Emails Don't Unarchive
In some situations, your archived emails may not unarchive as expected. Here are some troubleshooting tips that you can utilize to resolve the issue.
- Finding the wrong folder: Double-check the particular email in the "All Mail" section. You will never find archived emails in your inbox or any other section.
- Inbox over capacity: You should delete unwanted emails to free up space if your inbox storage limit is full.
- Permanently deleted: A message may have been deleted from your account entirely and cannot be recovered if a message is no longer in “All Mail.”
- Forgetting to select: Ensure you select the emails you want to unarchive. The unarchive option only appears once one or more messages are checked.
- Page timeout: If the page times out or you lose connection after selecting emails, your selections may be lost. Try reloading the page and selecting it again.
- Other devices: Check if the email appears unarchived on another device to rule out sync inconsistencies.
If problems persist, contact Gmail support. But in most cases, simple fixes like checking folders and refreshing and tweaking filters should resolve archived email issues.
Best Practices for Unarchiving Emails in Gmail
Keep these best practices in mind to easily find and unarchive emails whenever needed:
- Don't permanently delete emails unless you are sure you won't need them; instead, archive older messages.
- Add meaningful subject lines to emails to make searching archives easier later.
- Use labels, stars, and other organizational features to tag important conversations.
- Clean up your inbox regularly to make space for unarchived emails.
- Avoid archiving too aggressively. Only archive things that may be of importance to you in the future.
Proper email management and archiving discipline will ensure your important messages are never truly lost in your Gmail account.
Wrapping up
Unarchiving emails in Gmail effortlessly restores messages you need access to with just a few clicks. Use the All Mail folder to search and unarchive individual or multiple archived conversations. Set up filters for smart automated unarchiving based on sender, keywords, dates, and other criteria. With this simple guide, you can retrieve any important message anytime, whether unarchiving in bulk, by categories, or individually. This guide has shown you exactly how to unarchive in Gmail.
Frequently Asked Questions
1. Is it possible to unarchive your Gmail?
Yes, you can unarchive your emails by following some important steps. It usually includes finding the archived message by opening your Gmail account and ticking the box beside the target email. Later, you can click the ‘move to inbox’ section to unarchive the email.
2. What happens to archived emails?
Whenever you archive an email, it is instantly removed from the inbox. However, you will always find the archived email under the ‘All Mail’ section. Archiving is a useful feature that helps you unclutter your inbox and keep selected emails for future access.
3. How do I prevent my emails from being archived while swiping in the Gmail app?
Gmail archives your emails when you swipe it right or left by default. You can easily change the settings by following the given steps:
- Click on the Hamburger menu in the top left corner.
- Scroll down and click on Setting options.
- Tap on General Settings and click on Swipe Actions.
- Click on the Change option located beside the Right Swipe and Left Swipe.
- Choose None to turn off any action while swiping the mail. You can also choose from other options like Delete, Mark as Read/Unread, Move to, or Snooze to initiate an action while swiping the email.
4. Why is my Gmail not receiving messages?
There are different reasons why your Gmail account is not receiving messages, including the Gmail filter or rule. The filter archives emails and removes them from the inbox automatically. You can check by opening Gmail on your browser and clicking the Gear icon in the top right corner. Click on the See All Settings option, look for the Filters and Blocked Addresses section, and search for a filter that mentions Skip Inbox. You click on Delete to remove the rule or Edit to change it as per your preference.
Get Business Email
No domain name required